Call Events settings
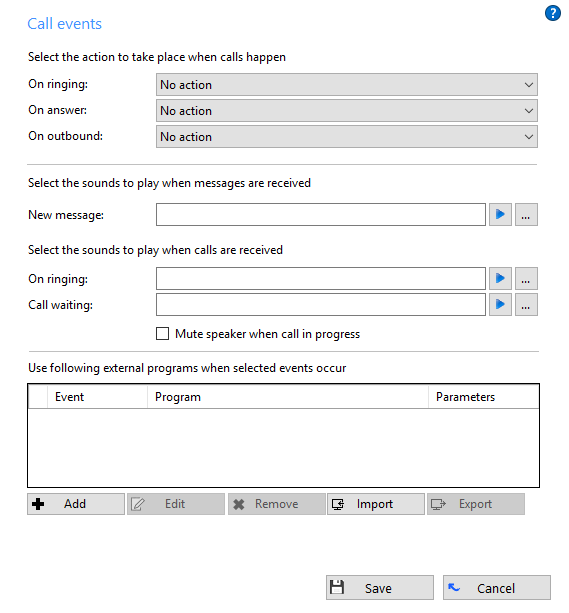
The Call Events page allows you to change settings relating to actions taken when a call is ringing or is in progress.

Default actions

You can make the software either show the Phone window or pop the contact when certain events happen. Just select the relevant action from the relevant dropdown list: On ringing, On answer, or On outbound.
Sound selection button

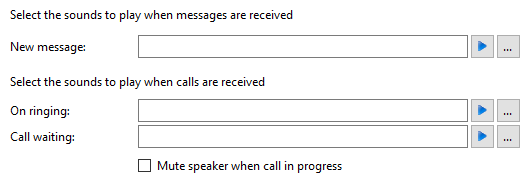
The next section allows you to choose a sound to have your computer play when your phone is ringing and/or you have a call waiting. This can help you to uniquely identify that it is your phone that is ringing and not a co-worker's. Please note that only audio files in WAV format are supported.

You can also check the box to have your computer's sound automatically muted whenever a call is in progress, which is useful if you listen to music or Internet radio while you work, giving you a more professional appearance.
External programs

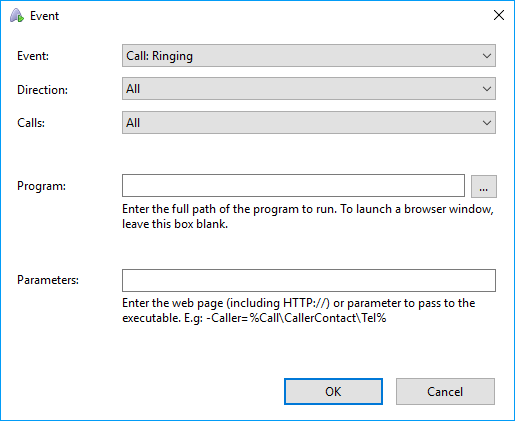
The software can also be configured to run one or more custom executable on selected events. To configure this, press the Add button and configure the following information:The Event list is used to select the event on which to run the program/application. The Direction list is used to select when it is either an incoming or an outgoing call. The Calls lists can be used to restrict events for internal/external or both.
The Program box allows you to select which executable to run. This box should be left blank to load an internet browser.
The Parameters box allows you to either choose the "command line arguments" for the program, or in the case of a browser, the URL to load. When using a URL, make sure that you include the URI scheme (ie HTTP://). Then you can include in the Parameters any number of values from the call. For instance, to output the caller's telephone number you can include %Call\CallerContact\Tel%. To use the telephone number of the remote party (as opposed to the caller, who may be the local user), you can use the syntax %Call\Contact\Tel%, or you can use %Call\Contact\DisplayTel% to get the formatted number.
To help testing, you can use the word Message Box in the Program entry, if you want to show a message box with the translated Parameter output. Finally a "custom" button can be added to the preview window allowing a user to control application popping in the same way as for standard integrated applications.
Click the "Save" button to store any new/edited information or click the "Cancel" button to discard any new/edited information.
Custom Events Setup Guide
Custom events and buttons can be used to pass call information from Horizon Integrator to other software using command line parameters under conditions specified by you.
For example, your custom event could create a new call record in a database that automatically includes the telephone number when a call is connected.
Information You'll Need
- Windows account username and password
Command Line Parameter Primer
For those who aren't sure what a "command line parameter" is, let's break it down with a brief run-through.
"Command line" refers to the "Command Line Interface" (CLI), a method of giving instructions to a computer by typing commands one line at a time to perform specific tasks like starting an application.
In very basic terms, a "parameter" is simply a definition of something e.g. name = Joe or telephone = 6329603210.
A "command line parameter" is just a parameter that is specified and used when a program is started by adding it to the end of the command line instruction that starts the program.
Another type of command line parameter called a "switch" can be used to start the associated program in a certain mode or affect it in some other way e.g. '–editmode' or '/AddNewContact'.
Let's take a look at an example of a typical command line instruction you would type manually and how it is made up:
-
C:\Program Files\YourCRM\YourCRM.exe /AddNewContact /Phone=6329603210
-
C:\Program Files\YourCRM\YourCRM.exe
-
This section is the full filepath to the app that is being started. If the command line was just this section on its own, the app would start normally.
-
-
/AddNewContact
-
This section is a switch-type command line parameter that causes the application to automatically add a new contact record when the app starts.
-
-
/Phone=6329603210
-
This section is a command line parameter that passes information to the application which in this case is a telephone number.
-
-
When the above example is run, it would open YourCRM which would then immediately create a new contact record by itself and enter "6329603210" into the "Phone" field.
When you set up your custom event parameters in Horizon Integrator, what you are effectively doing is using your chosen app's normal syntax except you substitute real call information with the name of the call information as in the example below. You can find the call information names and descriptions in the "Passable Call Information" section below.
-
C:\Program Files\YourCRM\YourCRM.exe /AddNewContact /Phone=%Call\Contact\Tel%
-
C:\Program Files\YourCRM\YourCRM.exe
-
This section is the same as before.
-
-
/AddNewContact
-
This section is the same as before.
-
-
/Phone=%Call\Contact\Tel%
-
The phone number that was here has been replaced with the name of the specific piece of call information. Note that "/Phone=" is still present.
-
-
Then, when Horizon Integrator runs your custom event, it inserts the current call information into the parameters where you have specified.
Please note that command line instructions and parameters are usually entered manually using the "Run" window but you won't be doing that. Once your custom event has been set up, Horizon Integrator takes care of everything. We will get to setting up your own custom event shortly. Also note that the structure of a command line instruction (also called "the syntax") can vary a lot from app-to-app. For example, some apps' parameters start with a hyphen character (-) like "-Phone" but other apps use a forward slash (/) instead like "/Phone" etc. Whatever syntax your app uses, the principle is generally the same.
Passable Call Information
The call information that can be passed to other software is listed below (note that some are quite similar):
| Description | Name |
|---|---|
| The number of the person making the call (this can be you if you are making the call) | %Call\CallerContact\Tel% |
| The number of the person the call is to (this can be you if you are receiving the call) | %Call\CalledContact\Tel% |
| The number of the other person you are speaking/spoke to, as given by the phone system | %Call\Contact\Tel% |
| The number of the other person you are speaking to, with the area code formatted for readability | %Call\Contact\DisplayTel% |
| The duration of the call (can only be used on events at the end of a call e.g. those using "Call Completed" triggers) | %Call\DurationTotal% |
| The unique ID of the call | %Id% |
Remember, the call information name must always be enclosed in "%" signs to properly identify it, otherwise the information will not be passed correctly. When Horizon Integrator runs your custom event, it inserts the call information into the parameter in place of the call info name e.g. if the other person's phone number is "6329603210", telephone = %Call\Contact\Tel% becomes telephone = 6329603210.
Chosen Application Parameters
Unfortunately, we can't help out that much with the parameters supported by your chosen app as you could be passing the call info to more or less any piece of software and each will have differing capabilities in this area. We suggest starting out with any help files or support documentation supplied with the software to find out what can be done using command line parameters. You could also search online using your chosen app's name and "command line parameters" as keywords.
Planning
Before we get started with the actual configuration, it's important to know exactly what you want the custom event or button to do and under what conditions it should do it. If you haven't already done so, we recommend that you sit down with the relevant colleagues and decide exactly what you need.
There are four areas for consideration:
- When to trigger the event
–There are two options here.
1.Choose a series of combinations between one of four events, one of the two call directions and one of the two types of calls triggers which automatically initiate your custom event at a particular point during a call.
2.Create a custom button that is clicked at the appropriate moment during a call to trigger the custom event manually.
The automatic triggers are:
- When the call is:
- Ringing
- Connected
- Completed
- Missed
- When the call direction is:
- In
- Out
- When the call is:
- Internal
- external
- When the call is:
- The program that gets triggered –This could be a CRM app or any other software. Please note that the passing of information between Horizon Integrator and your chosen app will only work if the app is capable of receiving command line parameters.
- The information that will be passed –There are several different pieces of information that can be passed from Horizon Integrator. These are listed in the "Passable Call Information" section along with further guidance on their use. This info can be passed to the triggered software along with any other parameters that are supported.
- What is done with the passed information –You may only be able to achieve a limited number of actions depending on the command line functionality of your chosen app so you should be aware of its limitations.
The quickest way to confusion during the actual configuration stage is by going into it without having these four areas sufficiently thought through.
Software Configuration
Right-click the Horizon Integrator tray icon in the system tray menu and then left-click the "Configuration" option from the menu that pops up. In the "Events" area, click the "Call Events" button to display the "Call Events" settings screen.

You can set default actions for certain conditions using the three dropdown boxes at the top but the section we are particularly interested in is the lower half.

To begin with, the box containing custom events and buttons is empty but we can remedy this by clicking the "Add" button. The event details screen will be displayed.

Select the required event trigger from the "Event", "Direction" and "Calls" dropdown boxes.

If you need to use a button rather than a trigger, you can select the "Custom: Button" option from the "Event" dropdown box instead and an extra textbox labelled "Text" appears between "Calls" and "Program". Enter the text you want to appear on the button.
The command line instruction that you will use to start your chosen app is broken into two parts: the program and the parameters.
The full file path to the program you are triggering (including the executable name) needs to go in the "Program" textbox. If you know the path you can type it directly into the textbox or you can click the "…" button to navigate to and select the program. Do not enter any of the command line parameters into this textbox. If you were entering our example from before, you would just enter:
C:\Program Files\YourCRM\YourCRM.exe

If you need to launch a web page instead of a specific piece of software, leave the "Program" textbox empty. All of the internet browser-related work is done in the "Parameters" textbox.
The "Parameter" textbox is where most of the magic happens as it is here that you will enter the required program parameters and call information to be passed to the triggered program. Any text that makes up the parameters other than the call information names will be passed to the triggered program "as is". If you were entering our example from before, you would enter:
/AddNewContact /Phone=%Call\Contact\Tel%

If you are launching a web page, enter the full URL and any required parameters, remembering to include the "http://" before the "www".
Once all of your custom event details have been entered, click the "OK" button to add your event to the list.

You can add as many custom events as you like but remember to click "Save" to store and apply them.
Further Information
If you need to make any changes to a custom event, highlight it in the list and click the "Edit" button to display the event details screen. When your changes have been made, click "OK" and then "Save".
To delete a custom event, highlight it in the list, click "Remove" and then "Save".
To load a previously saved custom event, click the "Import" button, navigate to and select the saved settings file and then click the "Open" button. Click "Save" to finish.
You can save a custom event by highlighting it in the list and clicking the "Export" button. Enter a filename and location to store the file then click "Save".

 Report this page